
Import
Use "Import" to upload files with information about orders and generate waybills for them. To open this section, go to :
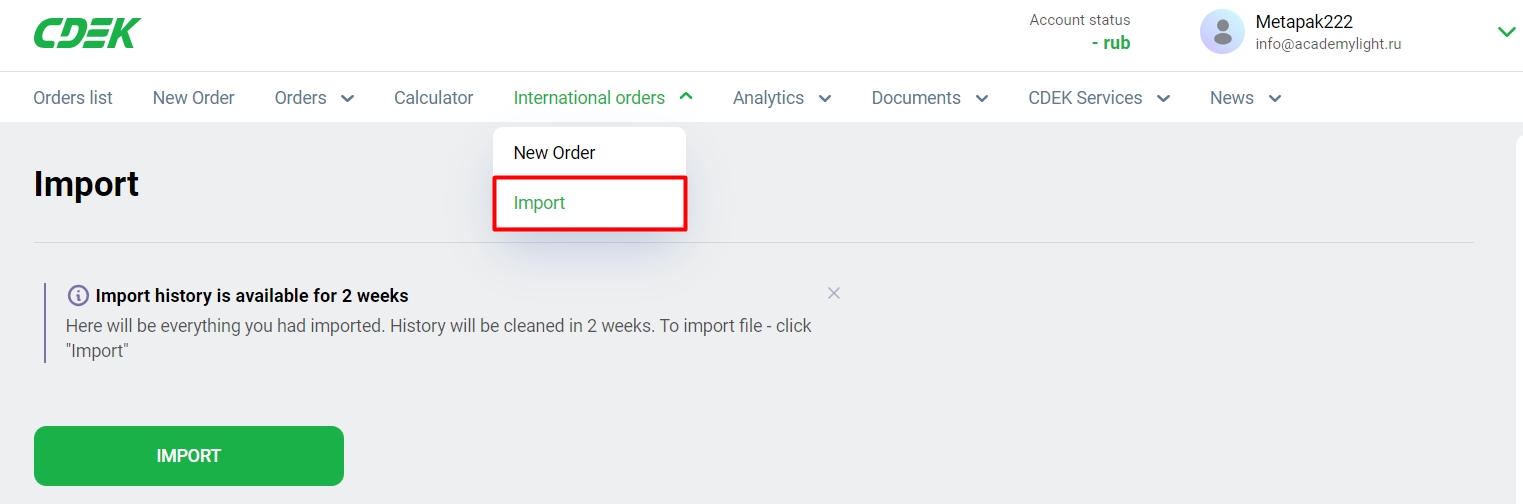
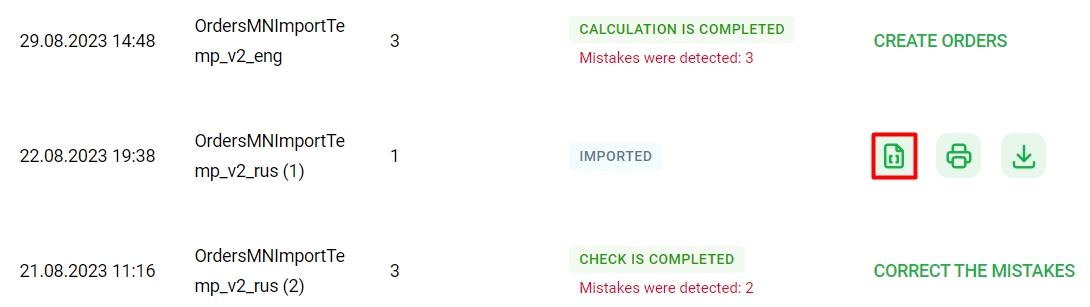
At the page bottom, you will find the history of all imported files (stored for 2 weeks). The files may have different statuses.
- Click Import, after which you will see this window:
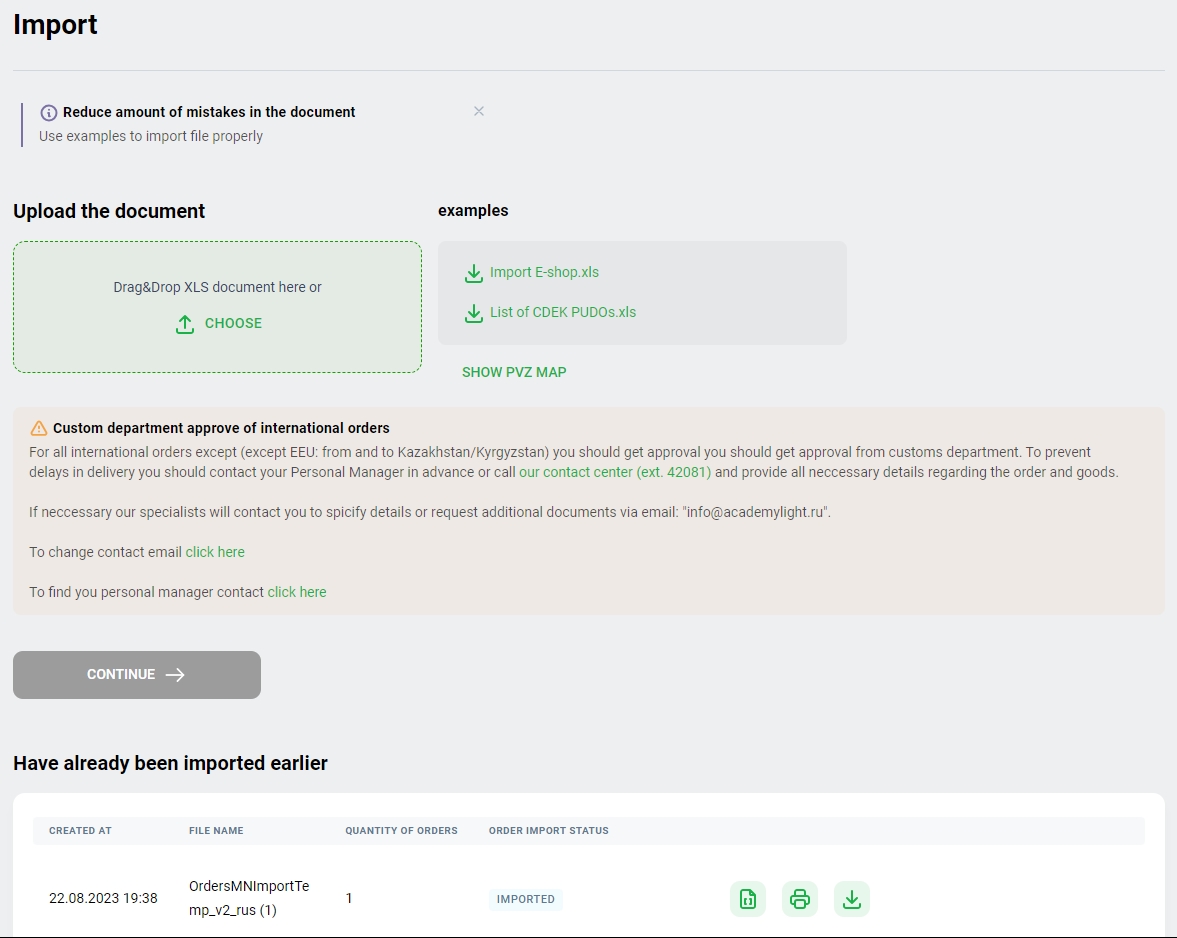
- On the right, you will find links to example import files; click the one you need:
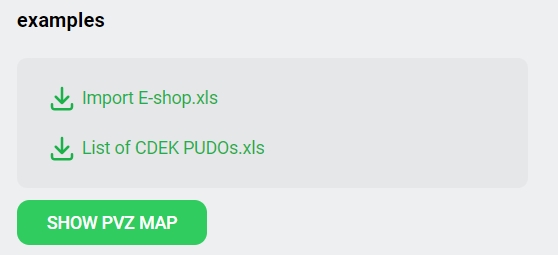 Note: example files may vary for different types of delivery.
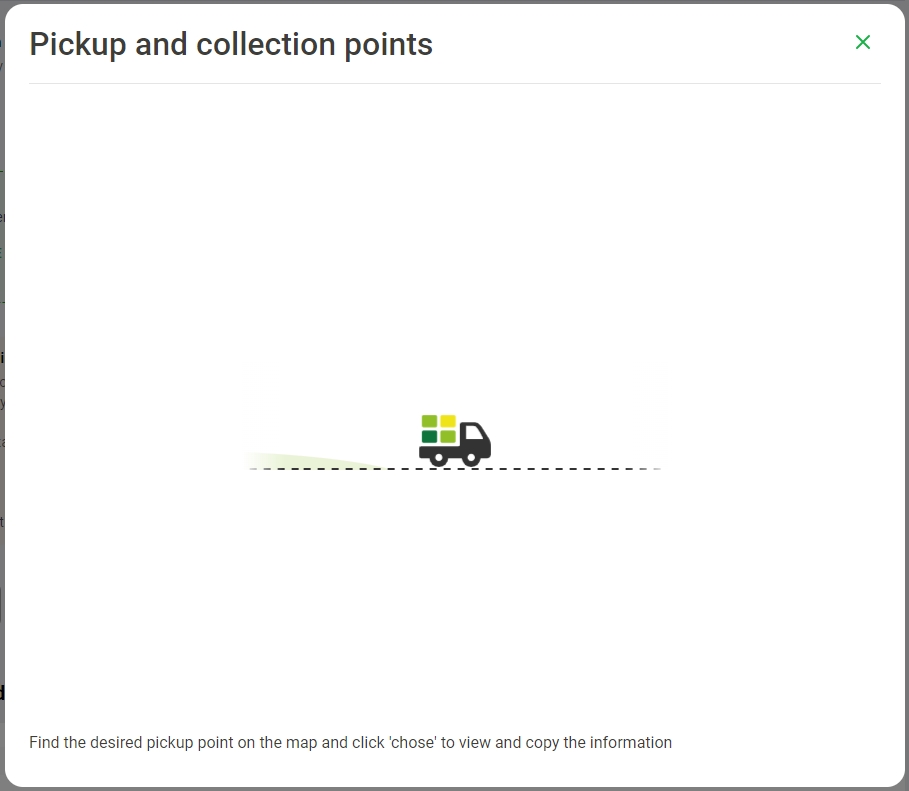
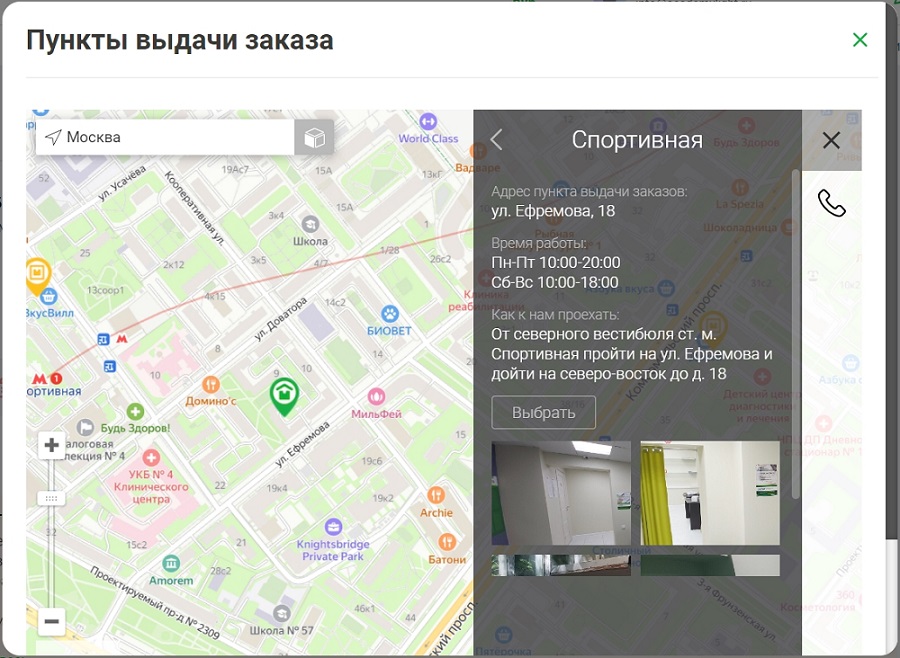
Click SHOW PVZ MAP to see available pick-up points. Click on a pick-up point to see detailed information about it:
- Generate an .xls file using the example file, and upload it by clicking the CHOOSE button, or drag and drop the file onto the drag-and-drop field.
 Note: you can upload .xls files only; better even if they are made of the example files. If a file is incorrect, the system will show an error: "File extension must be .xls, .xlsx".Important: you will have to clear your cargo with the customs department for any international shipping (except for the Eurasian Economic Union).
*Eurasian Economic Union member countries: Russia, Belarus, Armenia, Kyrgyzstan, Kazakhstan.
To avoid delays in delivery, contact your Personal Manager in advance, and provide them with the information about your shipment and goods in it.
We will contact you at "info@academylight.ru" if we need any further information.
You can change your email address here.
You can find your Personal Manager here.
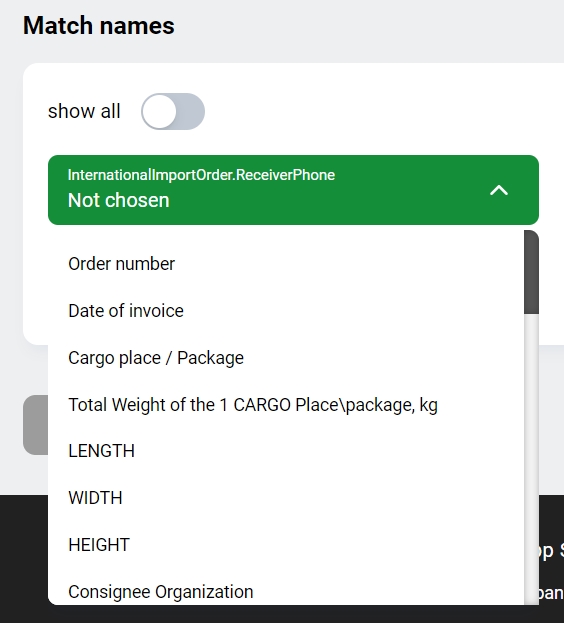
- If the columns in your document don't match with those proposed by the system, you will need to match them:Important:
- it will be better if the language in the uploaded document matches the locale - for instance, use files in Russian for the Russian locale. With this, you will have less fields to match.
- this page opens if a similar file has not been uploaded and matched earlier;
- if the columns in the file are correct, the system will match them automatically.
 Note: the switcher "Show all" shows all columns from your document.
The dropdown list will show all names of columns in your table.
 Attention: for now, the columns cannot be re-matched, that is, if you match the fields incorrectly and save the file, you will not be able to amend it! You can change names of the columns in the uploaded file, after which the page with matching will show again.
- Package Number - this field is mandatory. Must contain the individual number of an order/package; may include letters and figures.
- Invoice Date - this field is mandatory. Use the dd/mm/yy format, without time.
- Recipient's City - this field is mandatory. Must contain the receiver's city only.
- Recipient's Country - this field is mandatory. Must contain the name of the receiver's country.
- Postalcode of Recipient's CIty - this field is mandatory. Must contain the postcode of the receiver's city. If you chose delivery to a pick-up point, type in the postcode of that point.
- Recipient's Area - this field is optional.
- Recipient - this field is mandatory. Must contain the receiver's full name or the full name of the company.
- Recipient's Full Name - this field is mandatory. Must contain the receiver's full name.
- Receiver's Address - this field is mandatory. Must contain the street, house and apartment/office number of the receiver; you can add the township name here as well.
- Recipient Phone Number- this field is mandatory. Must contain the receiver's phone number.
- Recipient's E-mail - this field is optional.
- True Seller- this field is mandatory. May differ from the shipper.
- True Seller's Address- this field is mandatory.
- Shipper- this field is mandatory.
- Shipper's address- this field is mandatory.
- Series of recipient's document - this field is optional.
- Number of recipient's document - this field is optional.
- Issue date of recipient's document - this field is optional; use the dd/mm/yy format.
- Issuing authority of recipient's document - this field is optional.
- Recipient's date of birth - this field is mandatory; use the dd/mm/yy format.
- Tax Number (INN) - this field is optional.
- Counting number of the package- this field is mandatory. Must contain the counting number of the package.
- Weight of cargo place, kg- this field is mandatory. Must contain the weight of the cargo package in kilos; cannot be equal to zero.
- Lenght of cargo place, cm- this field is mandatory. Must contain the lenght of the cargo package in cm; cannot be equal to zero (whole numbers only).
- Width of cargo place, cm- this field is mandatory. Must contain the width of the cargo package in cm; cannot be equal to zero (whole numbers only).
- Height of cargo place, cm- this field is mandatory. Must contain the height of the cargo package in cm; cannot be equal to zero (whole numbers only).
- Item code/article - this field is mandatory. If there are no markings, type "1".
- Product name - this field is mandatory. Must contain the name of the goods in the parcel; what you are sending to the customer.
- Name in English - this field is mandatory. Must contain the name of the goods in the parcel; what you are sending to the customer.
- Cost per unit - this field is mandatory. Must contain cost of one unit of the goods; the currency is that of the destination country.
- Net weight of goods unit, kg- this field is mandatory. Must contain the weight of the goods in kilos; cannot be equal to zero.
- Gross weight of goods unit (with package), kg- this field is mandatory. Must contain the weight of the goods in kilos; cannot be equal to zero; must exceed the net weight.
- Quantity - this field is mandatory. Must contain quantity of the packages (in pcs).
- Cargo place weight, kg- this field is mandatory. Must contain the weight of the goods in kilos; cannot be equal to zero.Note: to calculate the weight of the cargo package, make sure it is no less than the sum of the biggest net/gross weight of the goods multiplied by the quantity of this goods.
- Link- this field is mandatory. Must contain the link to the goods.Note: format of the link: "https://lk.cdek.ru/international/order/create".
Once the matching is finished, click "NEXT", after which the system will start checking the document for mistakes:
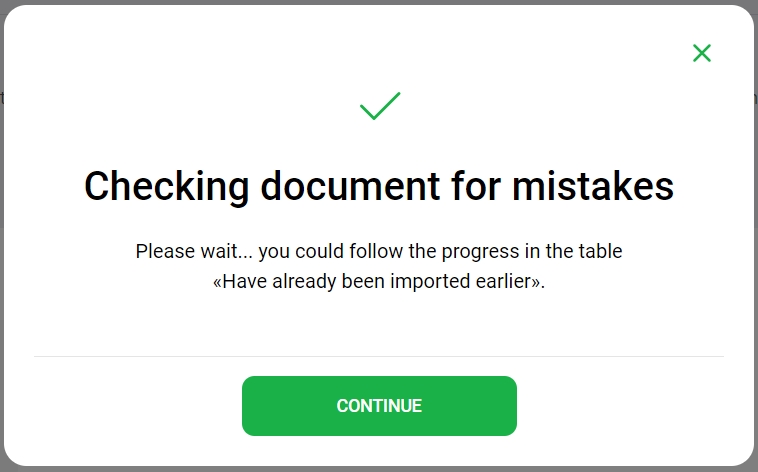
Once the check is completed, click "CONTINUE".
- The table will contain information about the orders:
The table contains one or several lines with the information about the receiver. On the left, opposite of each receiver, there is an icon indicating if there are any mistakes in the receiver or in the goods to be sent. If the system finds mistakes, it will show them to you:
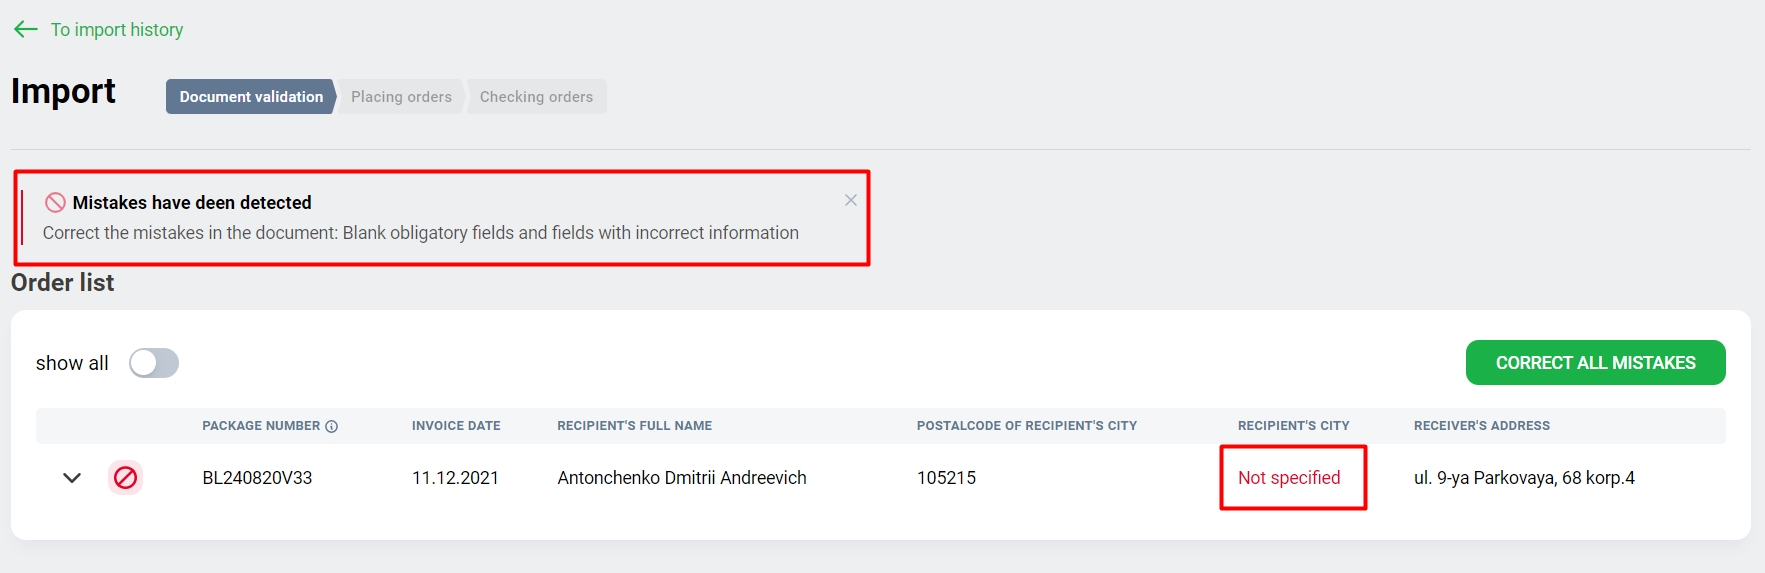
Incorrect or empty fields will be marked with red; place the pointer on them to see what's wrong.
The switcher "Show all" shows all orders, including those without mistakes: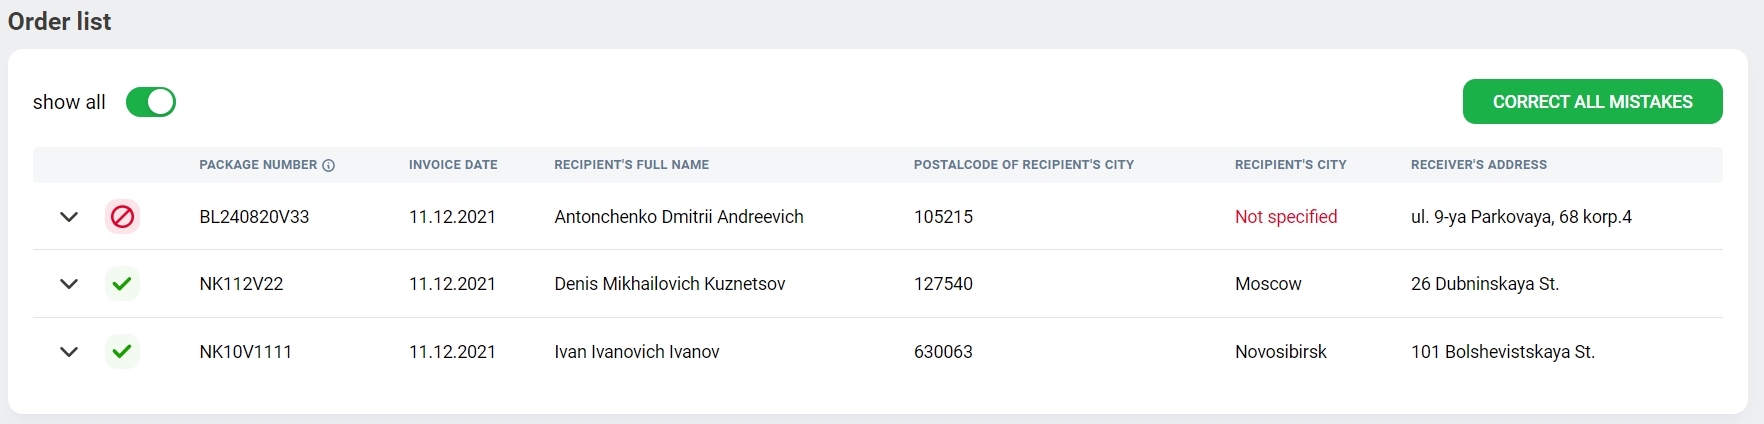
Click "CORRECT ALL MISTAKES", after which you will see the window "Mistakes in No.***":
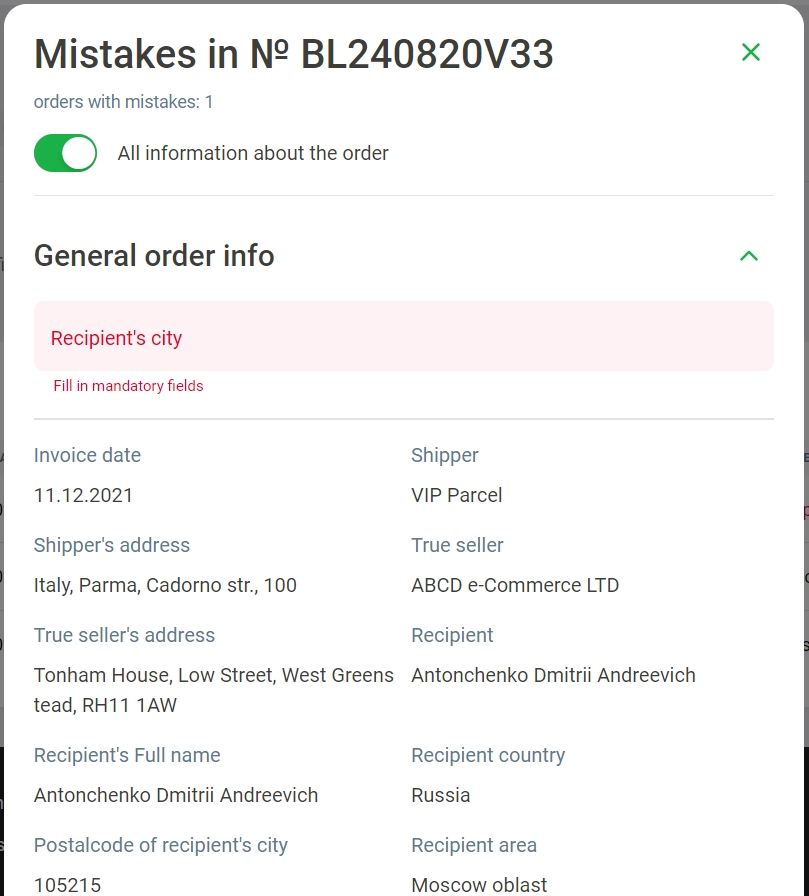
The switcher "All information about the order" will open each section with the information about the order: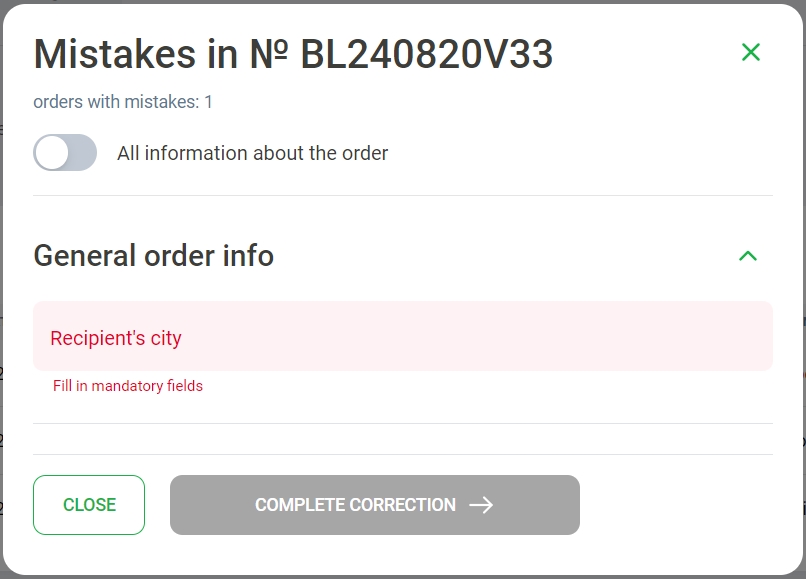
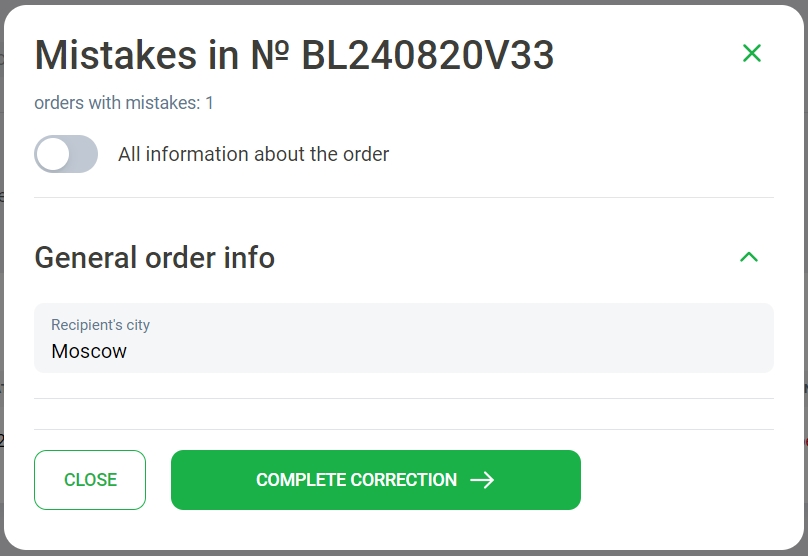
 Enter correct information in the fields, click "NEXT" and change the information again. Correct mistakes in all incorrect orders (see their quantity at the top of the section), and click "CONTINUE" at the last one.Note:
- if you see the "Several values" mistake, click on the field with the left mouse button. You will see a list with the values; select one of them or enter a new value manually.
- you can edit all fields with the button
 (available only in orders with mistakes, the switcher "All information about the order" must be switched on).
- Once all the mistakes are corrected, click "COMPLETE CORRECTION":
- Next, click "CREATE ORDERS":

- You will see the "Placing orders" form, where you will need to fill in the following fields:
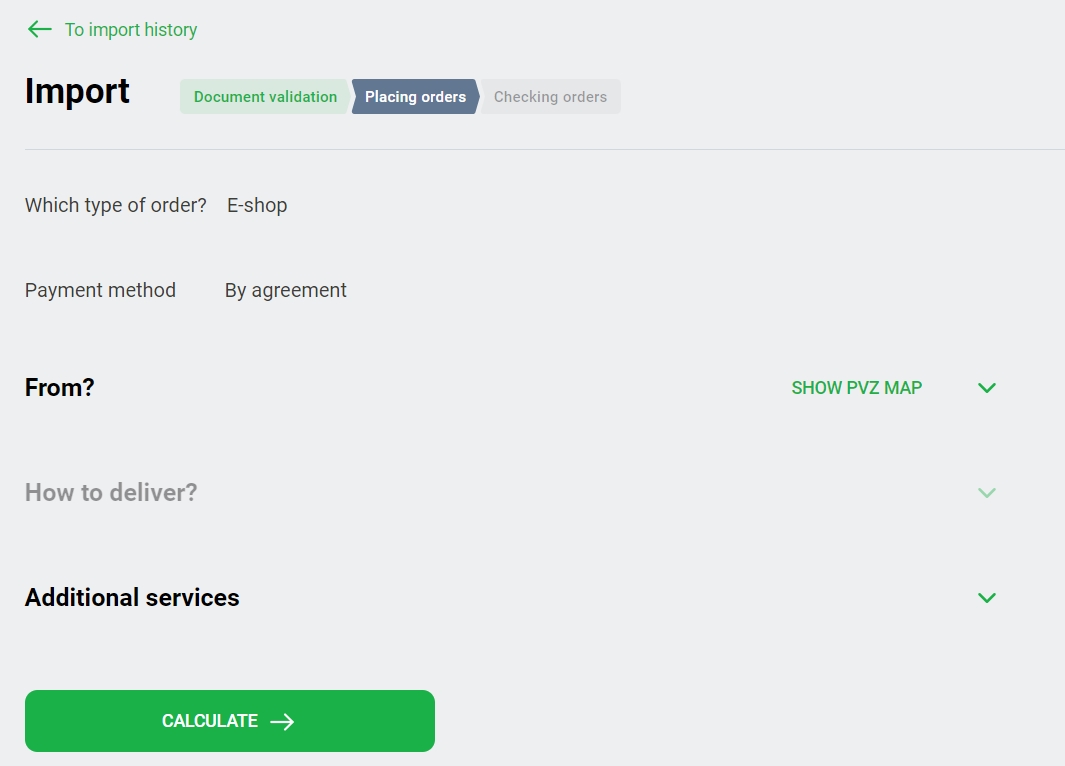
- FROM?:
- Click SHOW PVZ MAP to see available pick-up points. Click on a pick-up point to see detailed information about it;
- Sender city - start typing in the name of the sender's city and select from the dropdown list the one you need.Attention: please note, the export of certain types of goods from the territory of the Russian Federation is carried out in accordance with the Decree of the Government of the Russian Federation of March 9, 2022 N 312.
- How to deliver? - select a tariff that suits you best:

If you open All, the tab will show all tariffs available for all shipping modes. The information about costs and shipping time is set out opposite each tariff. Other tabs will show tariffs relevant for the selected shipping mode.
- Additional services:

There are several types of the services. Open a related tab, select services that you need, and fill in additional fields, if necessary.
- FROM?:
- Click "CALCULATE", after which the system will calculate price of the delivery with the available information:
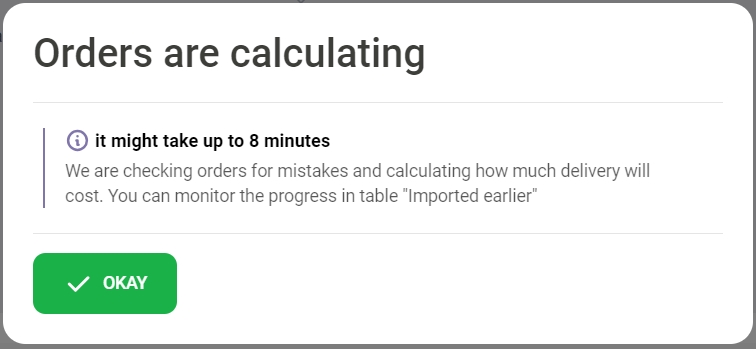 Attention: the calculation is normally done instantly, all you need is to refresh the page.
 - Once the calculation is done, the order will appear in a table with orders imported earlier:
Click "CREATE ORDERS" in the line with the relevant file. The "Check order" section will appear: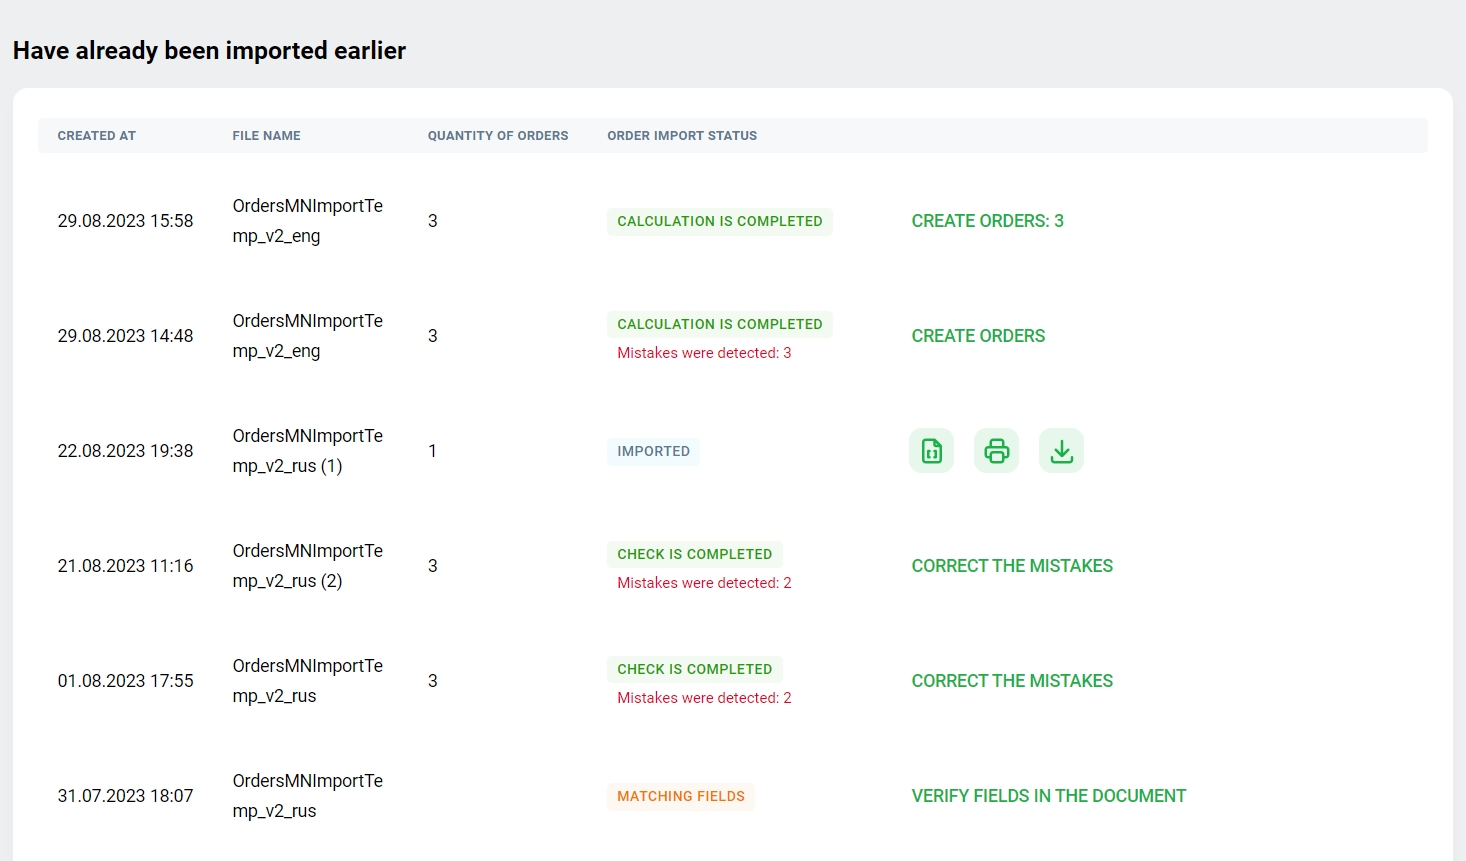
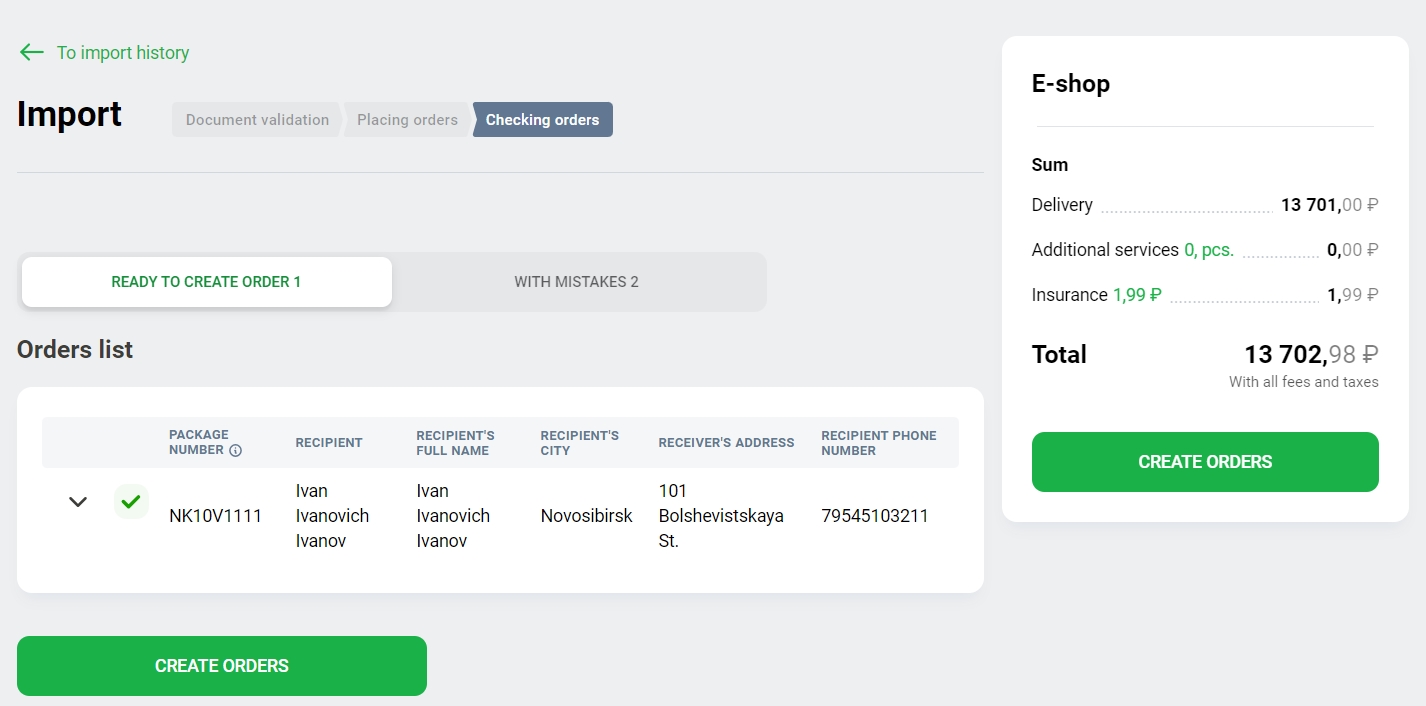
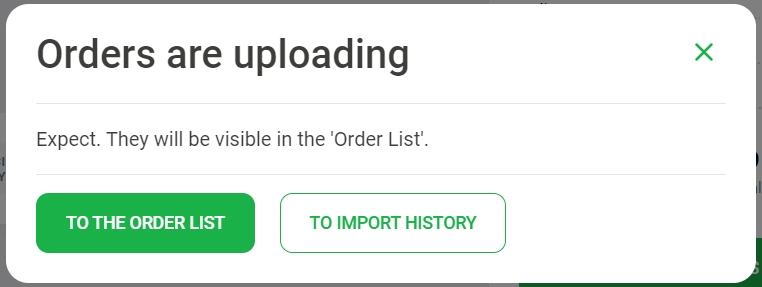
The tab "READY TO CREATE ORDER ***" will show the orders without mistakes and ready to be created. Click "CREATE ORDERS", and the system will start loading the orders:
 Important: if you don't see a particular order in the list, it likely contains mistakes. You can find it in the import history.
If the file contains mistakes, the system will notify you. Click the button to see the mistakes:
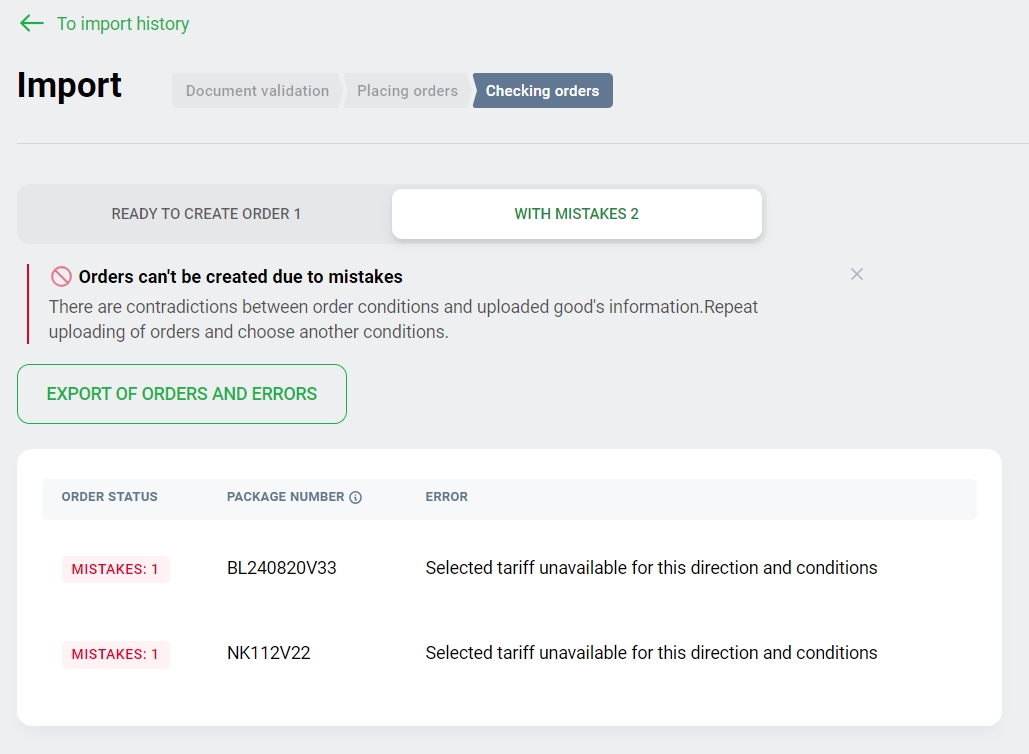
If there are mistakes in the orders, repeat the uploading of the orders and select other conditions for them. You can download the file in the Excel format and correct the mistakes in it. To do it, click "EXPORT OF ORDERS AND ERRORS":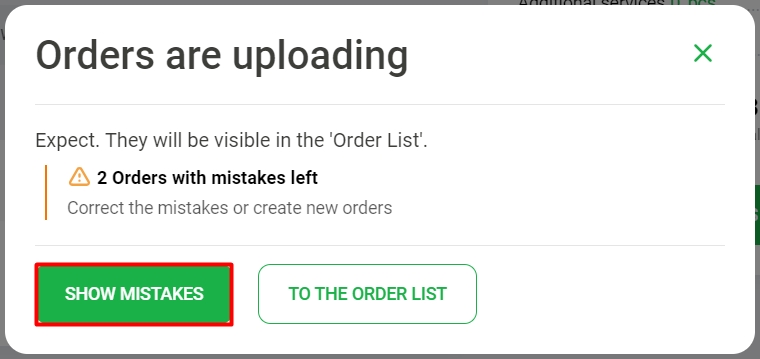
 When the import is finished, you can:
- Download barcodes for printing; to do this, click the button:
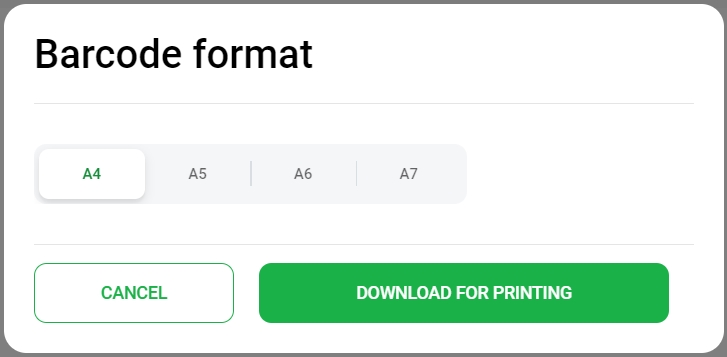
Select the barcode format and click "Download for printing":
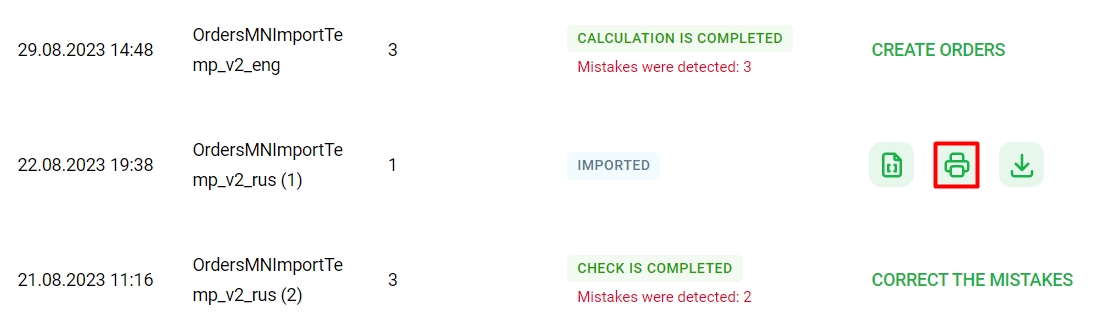
Download waybills for printing; to do this, click the button:
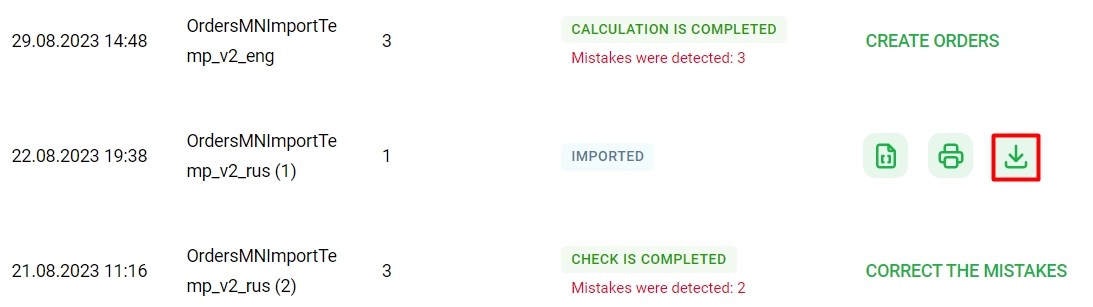
- Download the list in the .xlsx format; to do this, click the button:
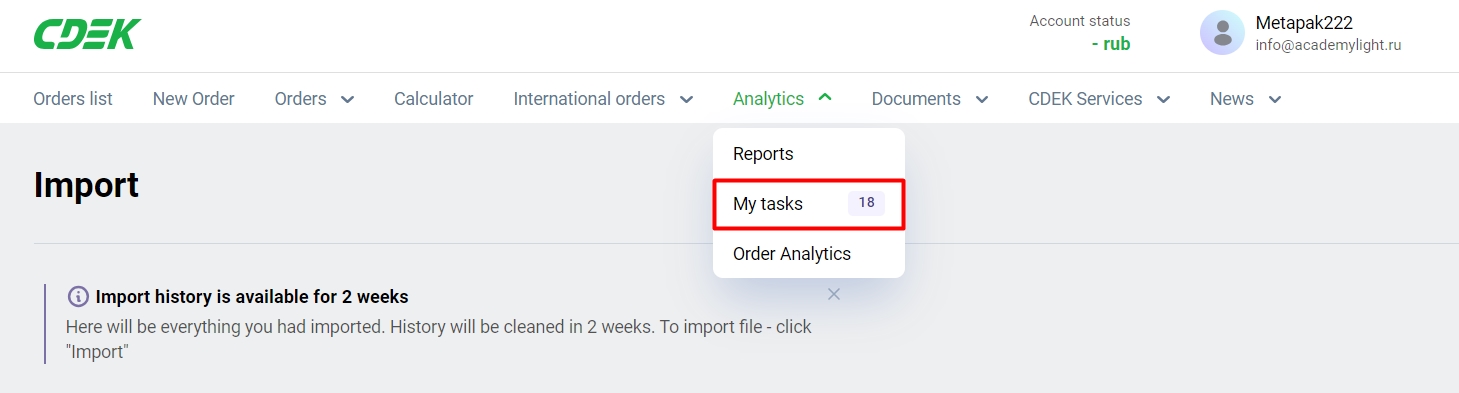
You can find the files in the "My tasks" section once a task is completed.
- Download barcodes for printing; to do this, click the button: